How to show iPhone screen on MacBook in 5 free ways?
Probably, you want to show your iPhone screen on your MacBook, but you don’t know how to go about it. If that is the case, you’ve come to the right place. Technically, showing an iPhone screen to a MacBook is an easy-to-do task, and you can do it right now. Whether you’re trying to show a website, a photo, or an app, it’s simple to get your iPhone screen projected onto your MacBook.
Requirements of iPhone and MacBook
Now, before you can show your iPhone screen on your Mac, at least your device’s software and hardware should support this functionality; otherwise, it might not be exciting. Kindly consider if you own either of these devices for compatibility.
AirPlay to Mac runs best when running on these operating systems and devices:
- iPhone 7 or later
- MacOS Monterey or iOS 14 0r later
- 2nd generation iPad Pro or later
- 6th generation iPad or later
- 3rd generation iPad Air or later
- 5th generation iPad mini or later
- 2018 MacBook or later models
- 2018 MacBook Pro or later models
- 2018 MacBook Air or later
- 2020 Mac mini or later
- 2019 iMac was introduced or later
- iMac Pro
- 2019 Mac Pro or later
- Mac Studio
However, suppose you own an older iPhone, Mac, or iPad model. In that case, you can also AirPlay to Mac but at a lover video resolution as long as it has an AirPlay Receiver setting in its Sharing settings configuration.
How to show iPhone screen on MacBook with Airplay?
If you want to show what’s happening on your iPhone screen to your friends, family, or colleagues on your MacBook, then you may consider using AirPlay. The AirPlay is a great way to mirror your iPhone display to your MacBook wirelessly. With AirPlay, you can easily stream video, audio, and photos from your iPhone to your MacBook.
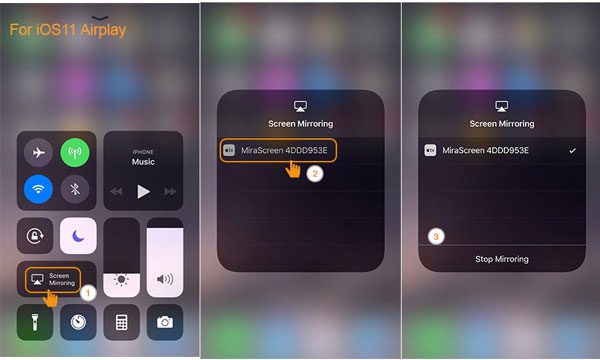


Here’s how to achieve this with your devices:
- Connect to the same Wi-Fi. Make sure your Mac computer is connected to the same Wi-Fi network as your iPhone; however, if you’re not connected to Wi-Fi, that doesn’t mean you can’t use Airplay! This is because Airplay’s Peer-To-Peer features use Bluetooth for mirroring the phone even when there’s no Wi-Fi.
- Choose your device by going into System Preferences on your MacBook. Once you have opened System Preferences, you will see the option for Displays. Tab the Displays icon, and a drop-down menu will appear with several options, including AirPlay Display.
- Open Control Center by swiping up from the bottom of the screen. If you use an iPhone X or later, you can also open the Control Center by swiping down from the top right corner of the screen. On the page that appears, tap the Screen Mirroring icon. You should see a list of devices that are available for mirroring.
- Select the name of the device you would like to mirror. In this case, it would be your MacBook. You will then be presented with a list of available devices currently broadcasting over the same Wi-Fi network. If you select “Mirror,” then whatever is displayed on your iPhone will also be displayed on your Macbook.
- A prompt will appear asking you if you want to accept the connection, so click “accept.” The contents of your iPhone should now be displayed on your MacBook. Depending on your version of iOS, you may need to unlock your device for it to be mirrored. Enter the device password if necessary, then click “Done.”
- If you ever need to disconnect, go to the Control Center and click the Disconnect button.
Enjoy your iPhone on the big screen!
How to show iPhone screen on MacBook with QuickTime?
Do you want to show your iPhone screen on your MacBook? It’s easy to do and handy if you want to share something from your phone with a friend or colleague. Here is a step-by-step guide on how to display your iPhone screen on your MacBook via QuickTime.
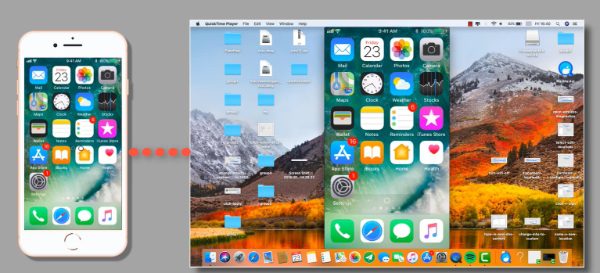


Step-by-step guide:
- Connect your iPhone to your MacBook using a Lightning USB cable. Once connected, make sure both devices are powered on. If you’re running the latest version of Mac OS, you can open QuickTime Player from the Applications folder.
- Open QuickTime Player on your MacBook and select File > New Movie Recording. Then, you should see a window pop up with the webcam as the main image.
- Select File from the QuickTime Player menu, and then New Movie Recording. This will open a recording window with several options at the bottom. Select your iPhone’s name under the Camera option in the drop-down box.
- In QuickTime Player, go to File and select New Movie Recording. In the lower-left corner of this window, you should see a small arrow with an icon that looks like two overlapping circles. In the new window, you should see an option for selecting the camera source. Select the source from your iPhone, and it appears in the video window. If you don’t see it, try unplugging the USB and then plugging it back in again.
- Click the Record button to start recording your iPhone’s screen. A new window will appear that allows you to choose the video source (your iPhone). Once you’ve selected your source, click the record button again to begin. The new window will also show you what is being recorded.
- When you are ready to stop recording, press the stop button at the top of the window. If you’d like to save the video, click File > Export and then select where you’d like it saved
How to show iPhone screen on MacBook wireless with FlashGet Cast?
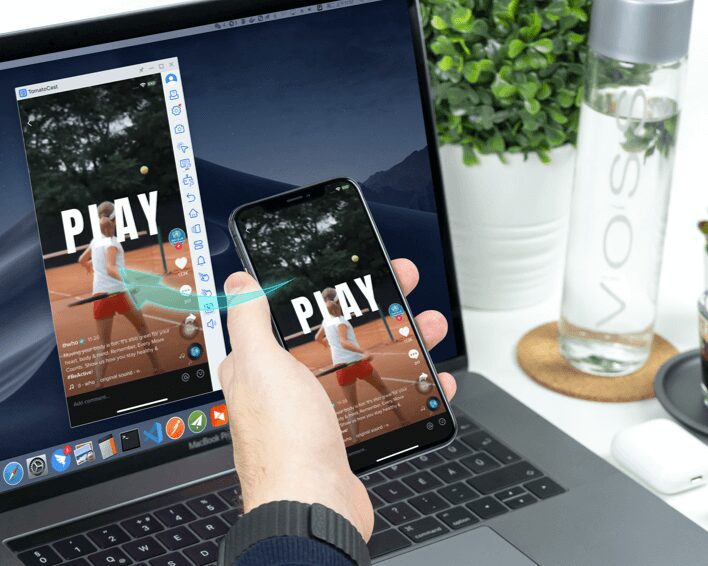


Another fantastic app you can use to show your iPhone screen on a MacBook device wireless is FlashGet Cast. Once that is done, you can stream videos and music and display photos between the two devices. This way, you can easily display your content on a bigger screen. Here are steps to show your iPhone, iPad, or iPod touch screen on your MacBook wireless.
Start by downloading and installing the FlashGet Cast app from the official website on MacBook. It’s easy. You have to click the download button.
Connect your iPhone and MacBook to the same Wi-Fi network. On your MacBook device, open the FlashGet Cast and choose AirPlay mode to connect with your iPhone. Kindly make sure that your devices are connected to the same Wi-Fi network.
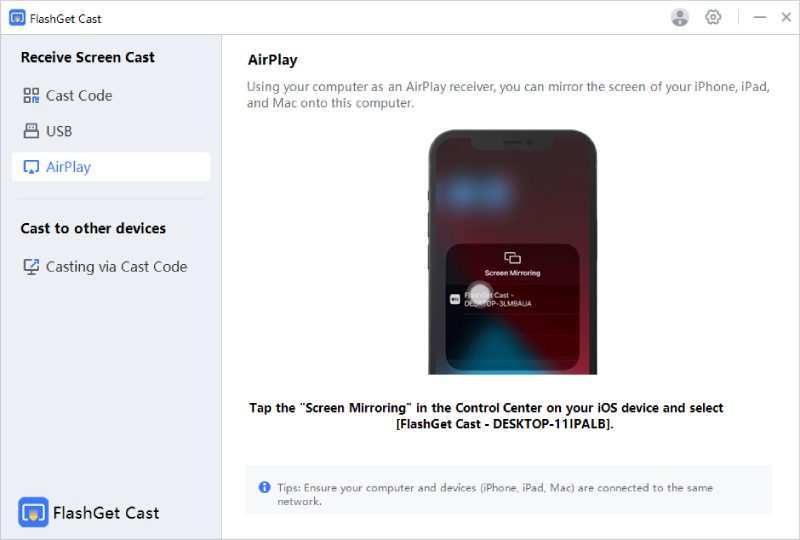


On your iPhone, swipe up from the bottom of the screen to access Control Center. Open the Control Center on your iPhone by swiping it up from the bottom of the screen. If you use an iPhone X or later, you can also open the Control Center by swiping down from the top right corner of the screen.
Tap the AirPlay button. On the control center window, tab the “Screen mirroring button” once you open the control center.
Select your MacBook from the list of devices. You need to pick the iPhone device you want to connect to from the FlashGet Cast app on your MacBook device.


Tap Mirroring to stream your iPhone screen to your MacBook. After selecting the iPhone device, you’ll receive a mirroring request asking if you want to accept. Just tap “Accept.” Once you tap the “Accept” request, your iPhone screen should now display on the MacBook screen, and whatever is displayed on the iPhone screen will now appear on the MacBook screen.
Without Wi-Fi:
Besides, if you’re not connected to Wi-Fi, you can use a Lighting USB cable to show your iPhone screen on your MacBook device.
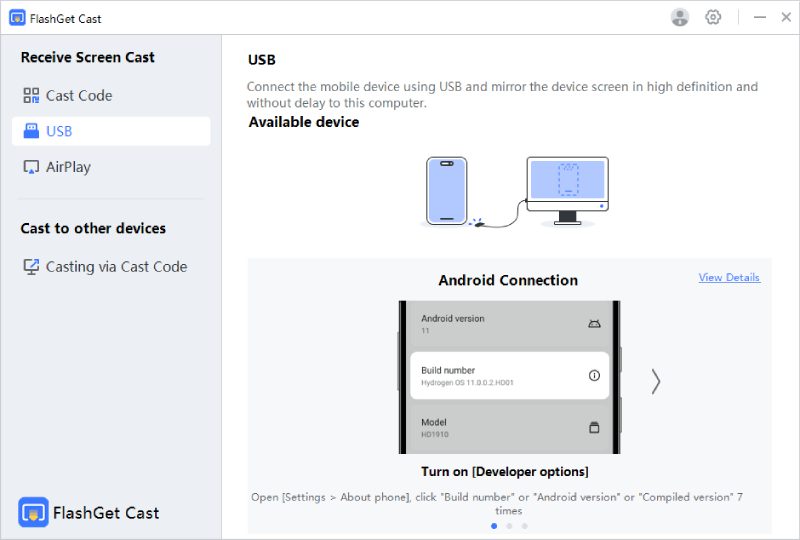


- Download the FlashGet Cast app on MacBook.
- Connect your iPhone to your MacBook computer using a USB cable
- Run the FlashGet Cast app on your MacBook. Select USB as the mode for connection.
- Select the iPhone device icon appearing on the FlashGet Cast app.
- Your iPhone’s screen will now be mirrored on your MacBook computer!
Pros
- One significant advantage of using FlashGet Cast is its straightforward use. It requires no complicated setup or additional hardware, so you can get your iPhone screen mirrored on your Mac in just a few taps. Plus, the app is free, so there’s no cost.
- It’s compatible with multiple platforms.
- It allows users to cast phone screens to PC with audio support freely
- Another pro is that the connection between your iPhone and Mac remains stable. This ensures that the mirrored screen will look sharp, so you can easily view what’s happening on your phone
- Besides, you can use it on Android and tablets to record audio and video mirroring
Cons
- It would be best if you were connected to the same Wi-Fi to use Airplay unless your mirror using a USB cable.
- Additionally, Airplay will not work over a cellular connection, so you’ll need a reliable Wi-Fi network in order to use it.
Overall, FlashGet Cast is a great way to quickly and easily show what’s happening on your iPhone screen on your MacBook.
Show iPhone screen on MacBook with LetsView
LetsView is a free tool that helps you quickly and easily connect your iOS devices to your Mac laptop or desktop computer. It only requires a few steps to set up the connection, and then you can see your iPhone screen on your Mac with just one click. You don’t need any extra hardware or software. All you need is an active internet connection. This powerful tool allows you to easily access photos, videos, and other content stored on your iPhone. Here’s how to connect and start enjoying the power of screen mirroring today.
- First, download the LetsView app from the App Store and install it on your Macbook.
- Once the installation is complete, ensure that your iPhone and Macbook are connected to the same Wi-Fi network.
- Then launch the LetsView app on your Macbook and click the ‘Mirror’ icon.
- After that, swipe down from the top right corner of your iPhone screen, tap the AirPlay option, and then select your Macbook name in the list of devices.
- Finally, click ‘Mirroring,’ and your iPhone screen will appear on your Macbook. That’s it! You can now start using your Macbook as a second monitor for your iPhone.
Pros
- LetsView is free to use to screen mirror iPhone screen to MacBook.
Cons
- A major downside of using LetsView is that you need to be connected to the same Wi-Fi network for the mirroring to work. That means if you want to show your iPhone screen while traveling, you’ll need access to a Wi-Fi connection.
Airplay iPhone screen to MacBook with Reflector 4
Reflector 4 is a great app to show a presentation or watch a movie or game together. You can also control the MacBook’s display settings from within Reflector 4, allowing you to adjust the size, resolution, and more. It’s a great way to share content between devices quickly.
- Download and launch Reflector 4.
- Connect your iPhone and MacBook to the same Wi-Fi network. Once you have installed the software, you must ensure that both the iPhone and the MacBook are connected to the same Wi-Fi network.
- Open the Control Center of your iPhone. To open the Control Center on your iPhone, you swipe down from the top right corner of the screen.
- Tap on Screen Mirroring, then select the name of the device you are trying to mirror your iPhone display onto, which should be the Macbook.
- Once connected, your entire iPhone display will be mirrored onto the Macbook.
Pros
- It’s easy to connect as you don’t need additional hardware
Cons
- The biggest drawback is that the image you view on your MacBook isn’t always as crisp and clear as it would be if you were directly connecting your iPhone to the laptop.
- The resolution is also dependent on your internet connection speed and strength.
- Finally, while Reflector 4 is a one-time purchase, you will need to keep an active internet connection in order to keep using it.
All in all, these factors must be taken into consideration when deciding if this is the right option for you.
A simple comparison
Probably, you want to know the best way to mirror your device’s screen to a larger display. Here is a simple comparison of AirPlay, QuickTime, FlashGet Cast, LetsView, and Reflector 4. These five technologies are the most popular options for streaming and mirroring. The table below will help you better understand which is correct. So, let’s get started!
| Feature | AirPlay | QuickTime | FlashGet Cast | LetsView | Reflector 4 |
|---|---|---|---|---|---|
| Ease of use | Seamless integration with Apple products. | Seamless integration with iOS devices to Mac computers | It has a user-friendly interface that makes it simple to use | It features an intuitive and easy-to-use user interface | Easy to use |
| OS compatibility/supported | It only works with Apple Products. | It is only available for Mac users and does not work on Windows or Linux systems. Its compatibility with specific devices is limited. | It supports Android, iOS, macOS, and Windows computers and mobile devices like iPhones and iPads. | It is compatible with both Android and iOS devices | It is compatible with both Android and iOS devices |
| Developer | Proprietary protocol stack created by Apple Inc | A free media player created by Apple | Free software that supports the control of iOS and Android devices from FlashGet Network | A free media player created by WANGXU TECHNOLOGY (HK) | An advanced mirroring software programs |
| Mirroring / Streaming / Casting Capabilities | Enables streaming audio, video, and photos from a computer or iOS phone to an Apple TV/ computer. | It can stream music from iTunes or iPhone to a Mac computer but cannot stream video. | It allows you to stream audio, video, and photos from one device to another. Its cross-platform compatibility ensures that it will work with various devices. | It provides a range of features like audio streaming, file sharing, online meeting tools, and much more. | Stream videos, music, and photos from various devices to your computer or laptop. |
| Price | 💰Paid services | 🎁Free to use | 🎁Free trial | 🎁Free to use | 💰Paid services: $23 |
FAQs about how to show iPhone screen on MacBook
- Check the system requirements. AirPlay and the Reflector app require that the device running the app use a version of macOS 10.15 or later. Updating your software can often resolve connectivity issues if your system is outdated.
- Then make sure your devices are connected to the same Wi-Fi network. If they aren’t, your iPhone won’t be able to recognize your Mac.
- Moreover, check your Mac's Bluetooth settings and ensure it is turned on. Bluetooth must also be enabled on both devices for AirPlay to work correctly.
- At last, if you’re using Reflector, restart the app and try again.
Conclusion
These mirroring apps offer a great screen mirroring experience that you need to taste, at least by yourself. You may consider trying one or two of these apps on your devices. Though they are all great, I would recommend FlashGet Cast, especially because it allows you to stream audio and video from one device to another, whether you’re using Android or iOS devices. Besides, FlashGet Cast supports various media formats and allows the ability to display clear images and videos without lagging.

What’s up to every body, it’s my first visit of this
web site; this web site carries amazing and really good material in favor of visitors.