Guide on share iPhone and Android phone screen to TV
If you’re an Android or an iPhone user, you’re probably tired of watching content on your small screen. Whether it’s a movie, pictures, presentation, or games, having it on a smart TV will improve the experience. If you want to learn how to screen share phone to smart TV with a few simple clicks, you’re in the right place.
Sharing your iPhone or Android mobile device to smart Apple TV may be daunting if you don’t know the right apps, cables, or adapters you can use to make this process a success. It can be even more frustrating if you have software but need the proper steps to set it up and start. Here’s a clear breakdown of everything you need while screen mirroring content from your iPhone or Android mobile device’s screen to TV.
Why do you want to share phone screen to TV?
If you want to know how to screen share phone to smart TV, you’re in the right place. Screen mirroring from a phone to Apple TV will helps improved user experience while watching content. Here is a list of reasons to implement this process to help you know more about the benefits of screen mirroring or casting.
1. Streaming quality content
Whether a movie or a work presentation, streaming on your Apple TV will improve the user experience and make it more exciting. However, this will entirely depend on the casting option you use to ensure they keep the quality while screen sharing content.
2. Multitasking support
Screen mirroring is also a great way to multitask and quickly complete different tasks. Users can watch a movie on the TV while checking their emails and replying to them simultaneously. Nonetheless, this method also depends on your streaming and screen mirroring option.
3. Free to use
The suitable casting options, such as FlashGet Cast, allow you to secure and install the App for free. Moreover, it doesn’t set limits on some of the incredible features it offers, such as the multiscreen screen mirroring option. Furthermore, you can use it on both Android phones and iOS devices.
What Apps can you use to share your smartphone screen to TV?
There are multiple screen mirroring and screen mirroring methods that you can use on your devices. The best part is that they only require a few steps to be ready. While they improve the quality, they are also compatible with various devices. Here are some of them:
- Airplay
- FlashGet cast
- Google Home
- Miracast
- Mirroring360
How to share Android phone screen to TV?
If you’re an Android phone user, it’s time to learn how to screen share Android screen to TV. With numerous methods requiring only a few simple steps, you’ll be ready to have content from your Android device to your TV.
1. TV’s screen mirroring
While sharing content from your Android phone to your Samsung TV might seem daunting, it’s relatively easy if you know the proper steps. However, missing the steps might lead to massive digital setting inconveniences. That’s why you need to follow the steps below keenly. But before looking at the steps, let’s quickly look at the pros and cons:
Pros
- It only requires a little third-party help.
- Improves streaming quality.
- Easy to set up and use.
- Compatible with multiple devices.
Cons
- It has a limited range of 30 feet.
- Constantly lags
- It has a lot of privacy concerns.
- Drains phone battery.
Steps for using Samsung TV’s screen mirroring
1. First, activate the Smart View feature on your Samsung TV to mirror your Android screen successfully.
2. To do so, go to Settings >General > External Connection Manager.
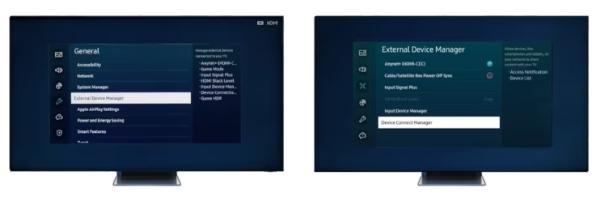


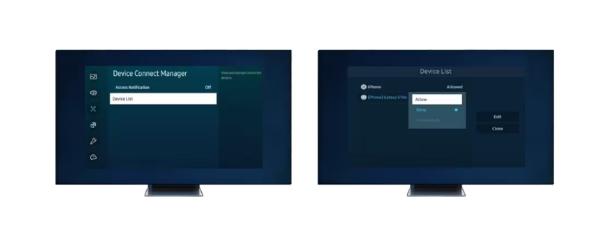
3. Go ahead and tap Device Connection Manager, then select Device List, then from the list, select the device you want to connect with and choose Allow.


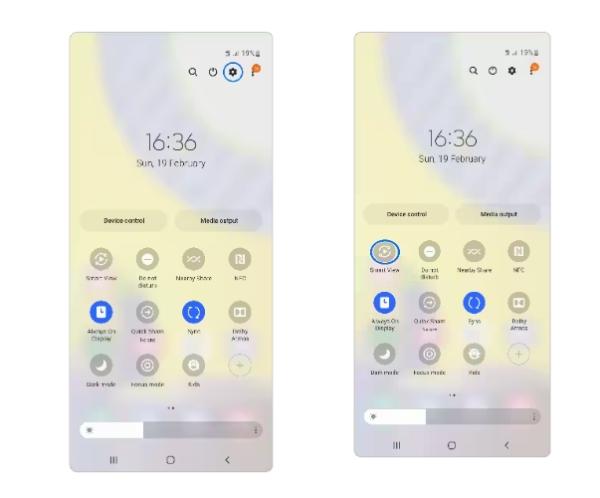
4. On your Samsung phone, drag down the top bar of the screen to see the Quick access bar. And then click on the SmartView Icon.


5. Choose the name of the TV you want to connect it to from the list of devices.
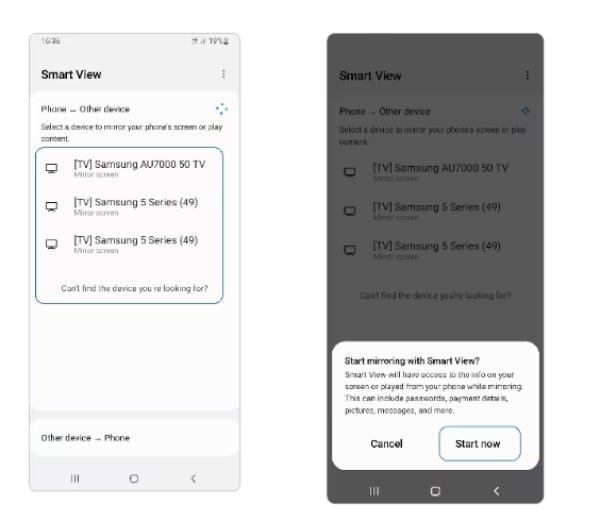


6. Once you have completed the prompts, your Android screen will be aired on your smart TV.
2. Google Home
Google Home is another great way to cast content from your Android screen to your TV without inconvenience. It has excellent features like quality video and audio while screen sharing, which makes it appreciated by many users. Here are some of its pros and cons to help you understand its features better:
Pros
- Compatible with numerous devices.
- Has a multi-room audio element.
- It gives users control over the speaker and TV using voice input.
- It has an easy-to-use interface
Cons
- Requires WiFi to work
- The quality could be more convincing.
- Faces a lot of lag concerns
Steps to use Google Home
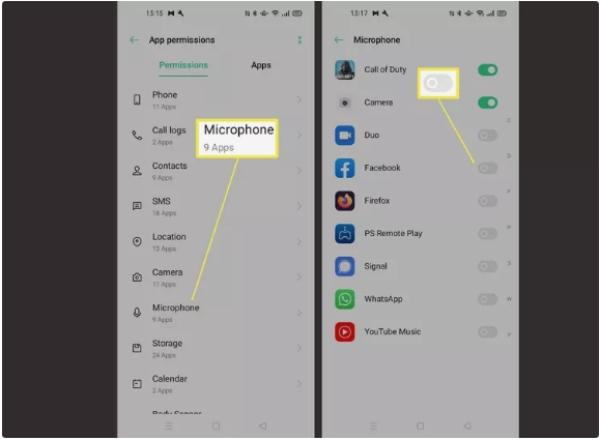
1. The first thing is to enable the microphone permission by navigating through the settings.


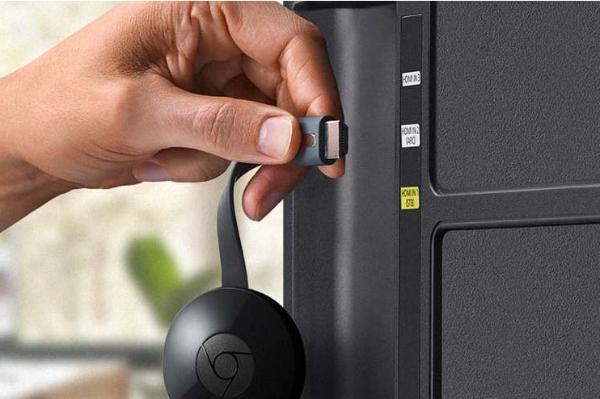
2. Ensure your TV is Chromecast enabled. You can connect the Chromecast device for TV if your TV doesn’t have a built-in Chromecast.


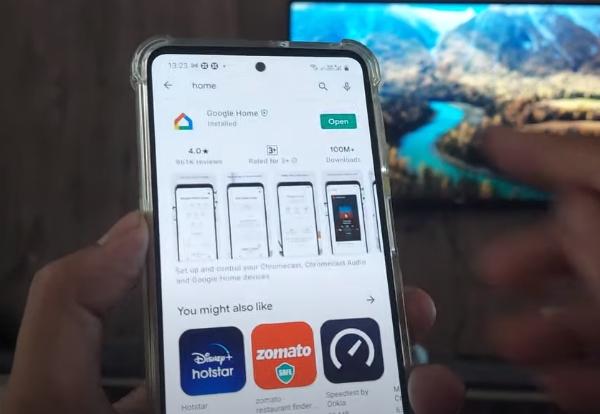
3. Download and install the Google Home App from the Google Play Store App.


4. Now launch the Google Home App and ensure your TV and Android device are connected to the same Wi-Fi network.
5. You’ll see a list of Chromecast-enabled devices on the home page of your Google Home app.
6. Tap on the tile with the name of your TV. A pop-up will appear with screen sharing symbol. Tap it effectively cast content from your Android device to your TV.
3. FlashGet Cast
While you can use FlashGet Cast on iPhone, it also allows you to access its incredible features on Android devices. Moreover, you can secure and install it for free and have it ready for use within a few minutes. Here are some of its pros and cons.
Pros
- It has an easy-to-use UI.
- While screen mirroring, it improves the audio and visual quality.
- It is comparable to a variety of gadgets.
- Allows you to operate the gadget remotely while screen mirroring.
- You can use multiple screen mirroring devices at the same time.
Cons
- You have to pay extra to enjoy the premium features of FlashGet Cast.
Steps for using FlashGet Cast
- Go to your device, and download the FlashGet Cast App from their official website for free.
- The next step is to open the FlashGet Cast web App on your TV.
- Once you accept all the permissions and scan the QR code, you can start screen mirroring from your Android device to the smart TV.
- Open the FlashGet Cast App on your phone and scan the QR code on your smart TV.
How to share iPhone screen to TV?
Learning how to screen share from iPhone to TV is an essential practice and activity that will help you have a quality content display. The best part is that there are multiple options you can use, such as FlashGet Cast, HDMI, and Airplay, to cast effectively.
1. Airplay
If you’re looking for how to screen share on iPhone to TV, then Airplay is the best choice you can count on. Airplay is an iOS feature you can set to ensure you cast content from your iPhone you your TV in quick steps. However, to use this incredible feature, you’ll need a steady and reliable WiFi connection that’s identical between your two devices.
Pros
- Straight forward to set up as it’s an inbuilt feature.
- Compatible with multiple Airplay devices.
- Elevates the convenient streaming quality.
- It provides users with the playback option and setting adjustments to fit the required standard.
- Perfect integration with the Apple ecosystem.
Cons
- Constant interruptions from notifications and phone calls.
- It entirely depends on Wi-Fi network to work.
- It only works with iOS devices.
- It drains the battery faster, especially if you are screen mirroring for hours.
Steps for using Airplay to share iOS phones screen to TV
1. The first step is to ensure your TV and iOS device are connected to the same Wi-Fi network for swift compatibility.
2. Now, head to your iPhone’s Control Center by swiping down from the top right corner of your iOS device.
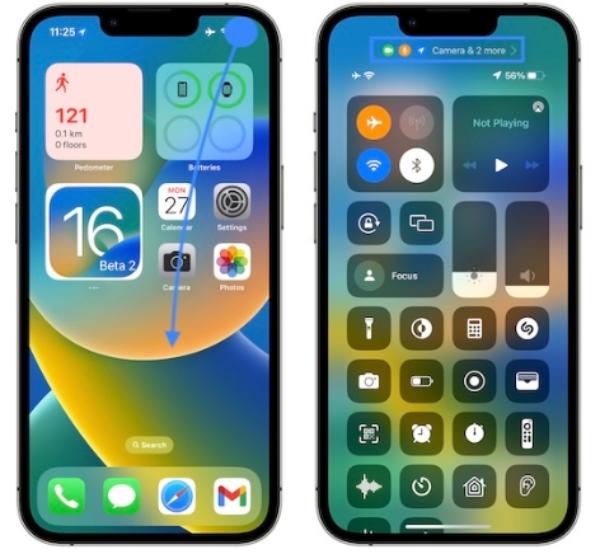


3. Click on the screen mirroring option and give it a few seconds to respond to the command.
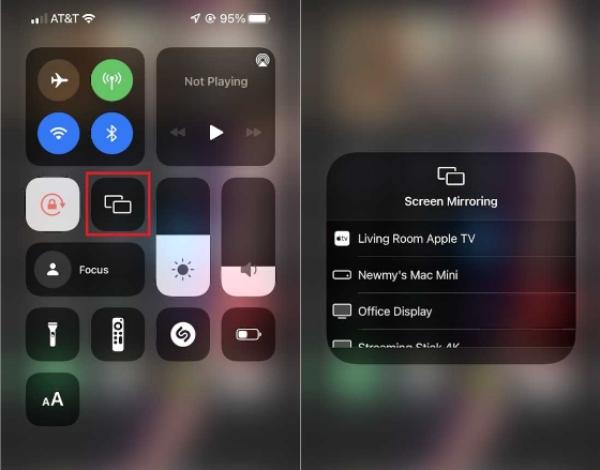


4. You’ll have a list of compatible devices. Now click on your TV to connect.
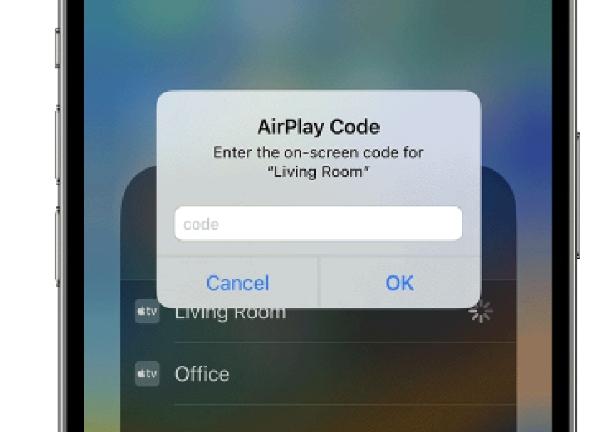
5. Insert the passcode requested, and you’ll have completed the casting process from your iPhone to your TV.


2. HDMI
Connecting your iOS device to a TV is another excellent way to have content on a bigger screen. Though considered an old-fashioned way of casting, it’s a strategy that many users still implement. However, you must have a suitable cable compatible with your device. The best part is that you can use it to connect in minutes.
Pros
- It’s easy to set up and use it.
- It’s a more convenient method compared to a wireless connection.
- Elevates the quality of the video and audio.
- Doesnt has any delays while setting it up.
- Works well with multiple TV brands.
Cons
- It denies you the ability to charge your phone while casting.
- You need a cable for the process to be complete.
- It doesn’t give you exclusive control compared to other methods.
- Has compatibility issues with older TV versions.
Steps for using HDMI to cast your iPhone’s screen to TV
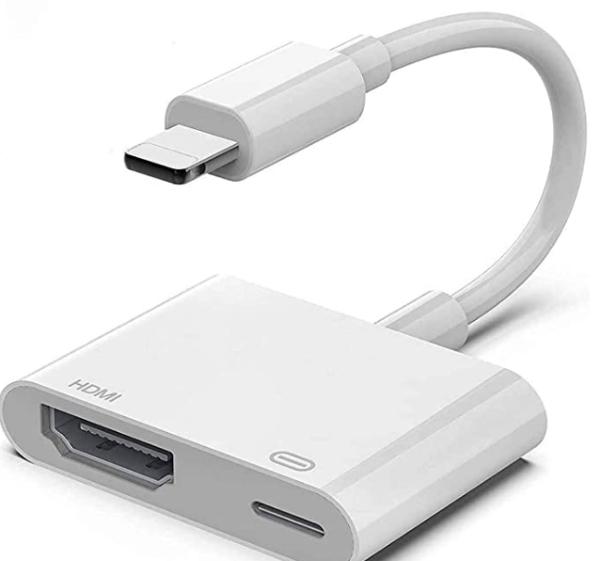
1. You’ll need to get a VGA or AV adapter and plug it into the lower part of the iPhone.


2. Now, attach the VGA or HDMI cable to your adapter to proceed.
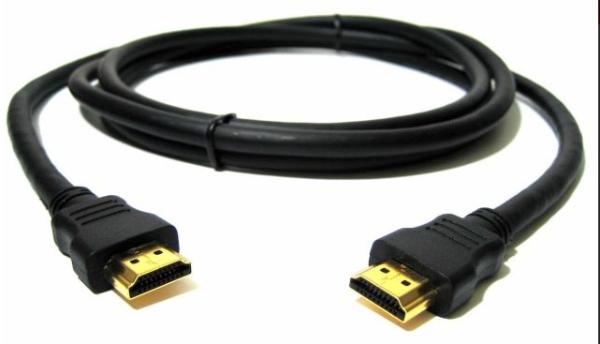


3. Use the other end of the VGA or HDMI cable to your TV.
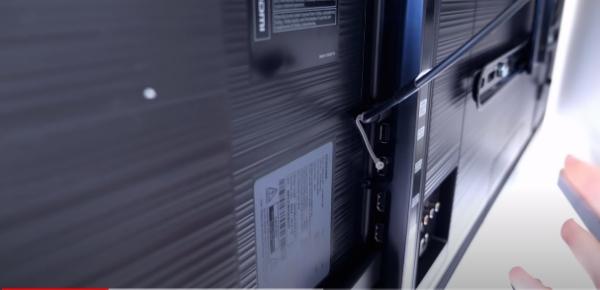


4. Once you have completed this process, you’ll have managed to have content from your iPhone to your smart TV.
3.FlashGet Cast
A few casting methods from iPhone to TV work, and FlashGet Cast is one of them. This incredible technique doesn’t require external devices to make the process work. You only need a steady Wi-Fi network connection and casting devices to complete the process. The best part is that you can secure and install FlashGet Cast for free.
Pros
- It’s compatible with numerous devices.
- It helps you to control the device while casting remotely.
- Allows users to have multiple casting devices in a single sitting.
- Free to secure and affordable to manage.
- Has a user-friendly interface.
- Enhances the audio and video quality while casting.
Cons
- You need to pay less for premium membership features.
Steps for using FlashGet Cast
- The first step is downloading and installing the FlashGet Cast App from its official website for free on your Android and iOS phones.
- Now launch the FlashGet Cast on your smart TV by navigating the browser. You’ll only need to enter ‘cast.flashget.com‘ and scan the QR code available. Alternatively, you can use the 9-digit code available.
- Once you have completed the QR scan, you’ll be ready and set to cast content from your iPhone to your TV.
Hottest questions related to share smartphone screen to TV
However, other ways, such as using third-party screen mirroring apps such as Airdroid Cast, will help you cast any content and help you manage the settings remotely. However, there are other methods, such as the Amazon Fire Stick or Chromecast, which you might use to make the process successful.
You can simply open the feature and connect to the device, either the laptop or TV you want to cast to. This will help you cast directly without using other third means of content transfer or cables.
Now use the prompts provided once the devices are visible to pair. However, for those who have devices that support Bluetooth but TVs that do facilitate the process, you can always set up a Bluetooth transmitter to help complete the process.
Once that is done, you can look for a reliable wireless casting option like Roku and Chromecast to facilitate the casting process. Ensure the two devices are on and navigate through the settings, to click on the screen mirroring options available. After selecting all the prompts, you can cast content to your TV screen.

Comments