5 methods on how to share audio on macbook 2024
If you’re looking for how to share audio on MacBook, you’re in the right place at the right time.
Sharing audio on a MacBook can seem easy, but you cannot make it work if you don’t have the proper steps.
However, you can make it work within seconds with the proper methods, tools, apps, and steps.
Fortunately, this piece has all the answers to your question, and by the end of reading it, you will know how to share audio on MacBook.
Can I share audio on my Macbook?
Yes, if you’re looking to share audio on your MacBook, fear not – it’s a straightforward process.
Start by opening up your System Preferences and navigating to the Sound Preferences. How to improve it:
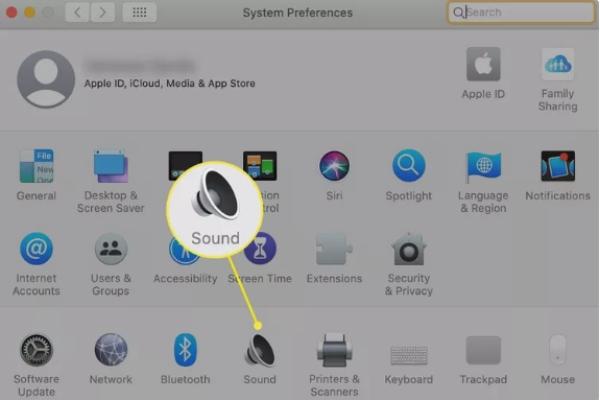


First, open system preferences and access “Sound.”
Now, in the output tab, click on the preferred option.
Next, use the slider to adjust the volume.
Now check the audio settings for more options.
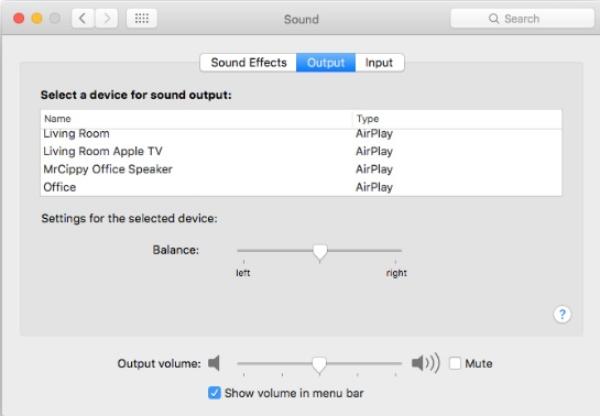


Then, use Airplay for a wireless sharing option.
Finally, play a sample to test the sharing.
5 different ways to share audio on Macbook
There are 5 different ways you can share audio on Macbook, and this section will help you figure out which methods you can use.
Airplay
AirPlay is an intelligent wireless streaming system Apple makes. It enables you to share music and videos easily between your Apple devices.
AirPlay helps you quickly send sound from a MacBook to speakers or Apple TVs. It’s great for sharing audio on the laptop.
This means you can quickly and in good quality bring sound from your MacBook to other things without wires.
Features
- Wireless audio sharing.
- Multi-room audio playback.
- Seamless integration with Apple devices.
- High-quality audio streaming.
- Simple and user-friendly setup.
Steps:
First, ensure Airplay devices are connected to an identical WiFi network.
Access the speaker icon on the menu bar.
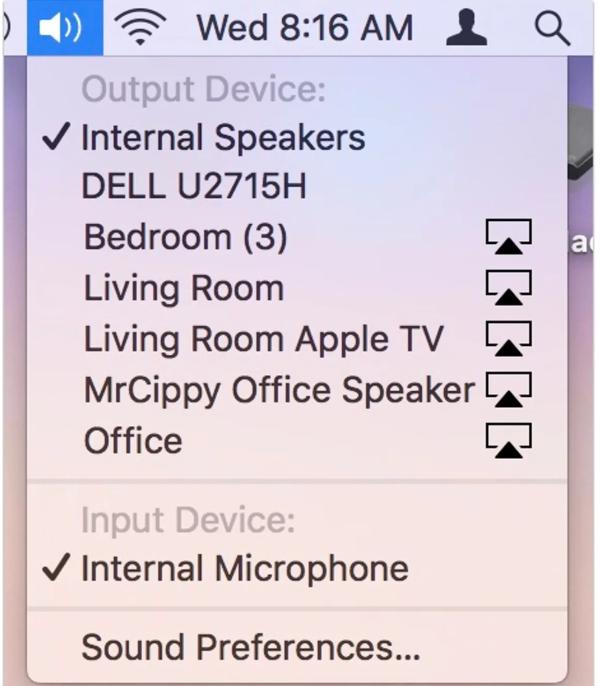


Tap on the Airplay device from the options available.
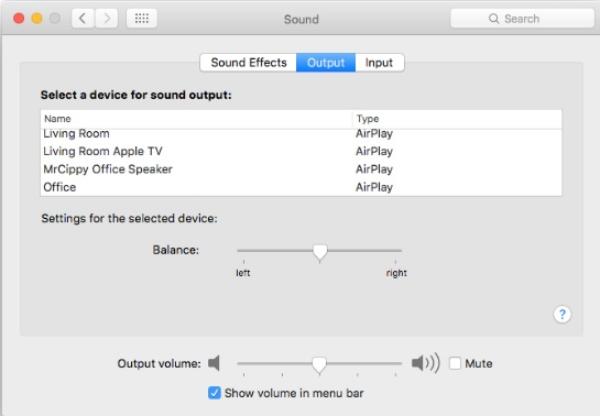


Once that is done, the audio can be shared wirelessly.
Bluetooth
Bluetooth is a popular wireless tech that lets people make short-range links between devices for many things, like sending sound.
For a MacBook, Bluetooth helps you connect and match with sound devices like speakers or headphones that can work well together.
Bluetooth helps with wireless audio so that you can move freely without cables. It’s very flexible and easy to use from a MacBook for sharing sound files.
Features:
- Broad compatibility with different audio tools.
- Widespread universal standard.
- Portable wireless audio sharing.
- Low energy consumption.
- Auto-connection feature for convenience.
Steps:
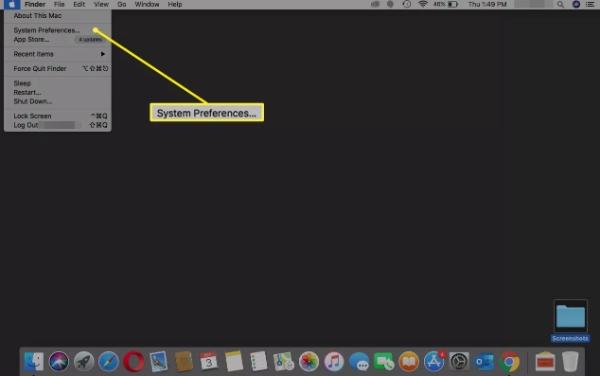
Ensure your MacBook Bluetooth is on by accessing the Apple logo and then “System Preferences.”


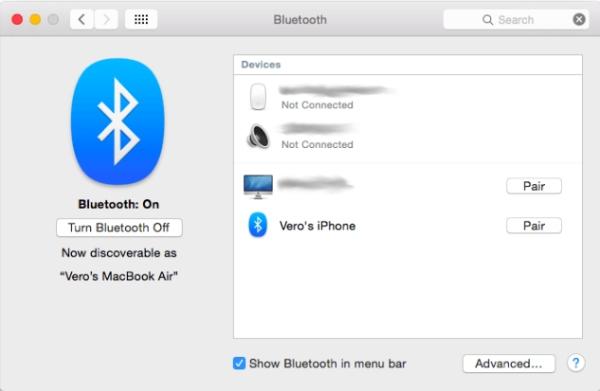
From there, you must ensure the MacBook is paired with the Bluetooth audio device.


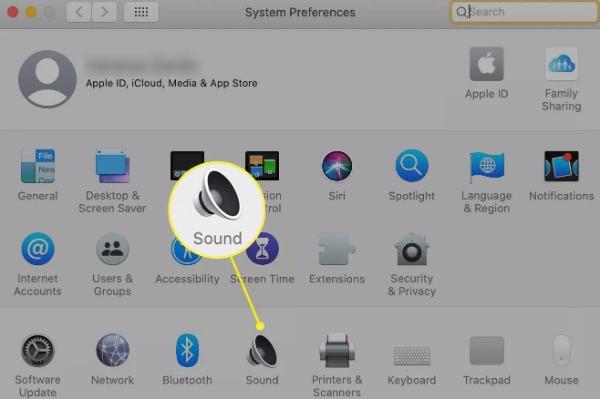
Now, on system preference, access “Sound.”


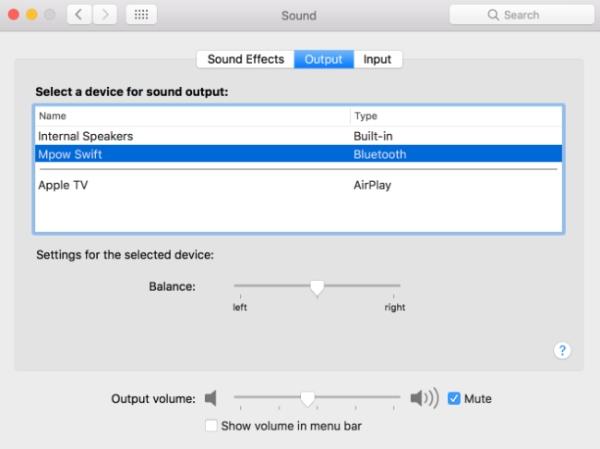
On the output tab, pick the Bluetooth device.


Cable connection
Using cables like a 3.5mm audio cable or USB is the old and safe way to connect your MacBook to an audio device with wires.
This straight, connected way guarantees solid and good sound sending. People can easily and quickly share sounds by plugging the MacBook’s sound port into an outside audio device.
This way is helpful when there may not be a good choice for wireless or an easy and surefire connection.
Features:
- Reliable and stable audio transmission.
- High-fidelity audio quality.
- Instant plug-and-play connectivity.
- Universal compatibility with diverse devices.
- Great for places with problems with interference in wireless signals.
Steps:
First, use an appropriate adapter on the 3.5mm audio cable to the MacBook.
Ensure the other side is connected to the external device.
Move to “System Preference” and “Sound.”
Access the output tab and pick the connected external device.
Screensharing
Sharing the screen on a MacBook lets you send more than just pictures. It also sends sound, making it suitable for working together with others.
Users can share their computer screens through the macOS settings, showing everything on their screen, including audio, with another Mac person.
This is perfect when people work together, get help from a distance, or show things in online meetings. Both pictures and sounds need to be shared at the same time.
Features
- Work together on audio and video by sharing.
- Quick virtual talks happen during online gatherings.
- Platform-agnostic compatibility.
- Works excellent for helping and fixing problems from a distance.
- Enhances accessibility for educational content.
Steps:
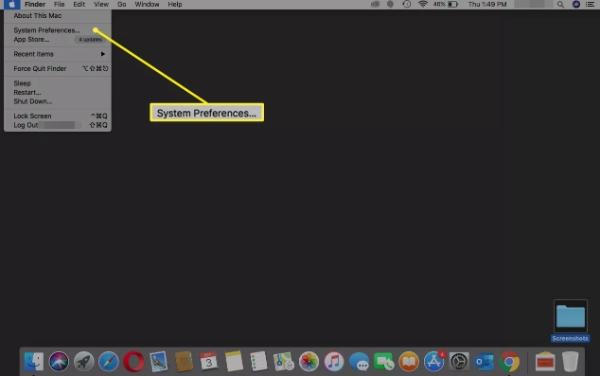
First, access the Apple logo on your device.
Next, move to “System Preference”


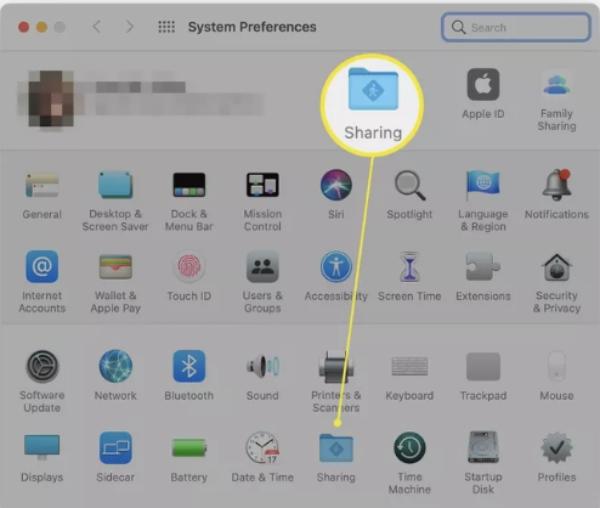
Now tap on “Sharing”


Ensure you tick the screen-sharing box.
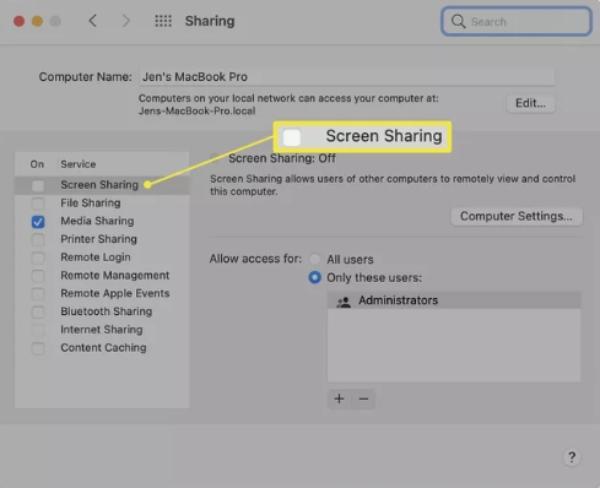


Tap “All Users” or “Only These Users” to limit who shares the screen.
Third-party Apps
Extra apps like Loopback give intelligent solutions for people who want to make significant changes and use sound differently.
Loopback makes fake sound devices on a MacBook. This lets people change and set up where their sounds come from or go. This way is constructive for experts or those interested in getting fine control over audio paths.
By setting up Loopback, people can make many sound setups that fit their needs. This gives more options than what comes with macOS audio settings by default.
Features
- Advanced audio routing capabilities.
- Creation of virtual audio devices.
- Suitable for professional audio configurations.
- Enables versatile audio setups.
- Provides greater freedom compared to what Apple’s macOS default provides.
Steps:
First, get and put Loopback on your computer from the main website. Use their putting-together rules to do it right.


Next, start the Loopback program on your MacBook after installing it.
Use Loopback’s tool to create pretend audio equipment that helps your sound move quickly.
Change how the computer operating parts use sounds (taking in) and where they send them.
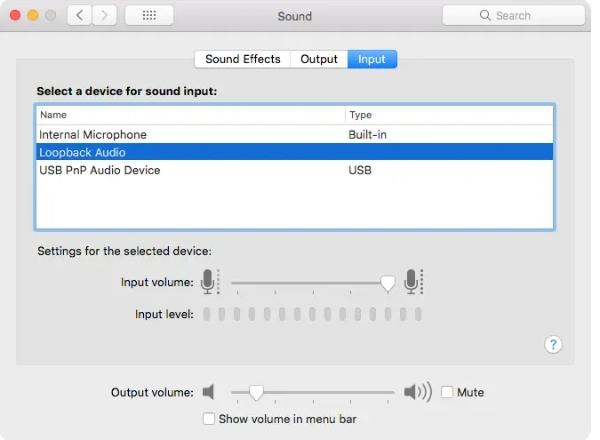


Make different sound settings for your needs beyond the basic default audio choices on macOS.
Go deep into Loopback’s big-time features to play with complex music paths. This gives more boss control than Apple does with its regular set options.
Bonus: Screen mirror via FlashGet Cast App
The FlashGet Cast App is a handy way to show what’s on your screen. It lets you quickly share the things you see with big screens and makes it easy for others to enjoy.
The app makes the screen mirroring process easy with a clear window. It lets people show their device’s stuff without any hassle.
FlashGet Cast helps devices talk to a screen without wires. This makes it easier for people and more fun when they watch videos or slides on their phones, tablets, etc., from far away screens in different places like classrooms or offices.
Features:
- Share Entertainment: FlashGet Cast lets you easily share movies, pictures, and games from iPhone and Android to more giant screens like PCs or TVs.
- Versatile Compatibility: The app works with many things like iPhones, iPads, and Macs that use AirPlay. It will also improve to get better quality for these devices and iOS, Android, and some TV isolates in the future.
- Professional Use: Besides fun, FlashGet Cast is very useful in workplaces. It makes it easy to put phone stuff onto computers or TVs, help with meetings, show products, and work together better.
- Enhanced Gaming Experience: Play mobile games on a PC with better graphics and less delay; use keyboard keymapping to type faster. This way, your gaming experience gets much better.
- Online Teaching and Training: FlashGet Cast makes teaching easier by letting you share your screen from a phone or tablet with a computer. Students can see notes and formulas simultaneously, so learning improves on computers like Macs and Windows PCs.
Conclusion
While there are many ways to share audio to MacBook, the best method you can access is FlashGet Cast.
FlashGet Cast offers the best audio sharing and mirroring option compared to other methods.
The best part is that you can easily access this tool for free. So try FlashGet Cast today for a better mirroring option.

This рost is truly a fastiԀious one it helps new the web uѕers, wһo are wishing fоr blogging.
Great info. Lucky me I recently found your site by accident (stumbleupon).
I have book marked it for later!
I all the time used to read paragraph in news papers but now as I am a user of web so from now I am using
net for content, thanks to web.
Fantastic post however , I was wanting to
know if you could write a litte more on this subject? I’d
be very thankful if you could elaborate a little bit more.
Many thanks!